
Tags are user-defined keywords or labels that can be added directly to a participant’s profile to help classify participants, flag important details, or quickly communicate relevant information to your team. Tags provide a flexible way to organize participant information without creating a Custom Variable and can be helpful for informal tracking, quick visual indicators, or grouping participants with shared characteristics.
NOTE: Tags are always global, meaning they appear in the Registry and can be viewed or modified across any study where the participant is associated.
Tagging a Participant
Users with access to a participant’s profile can add, update, or remove tags in both the Study and the Registry.
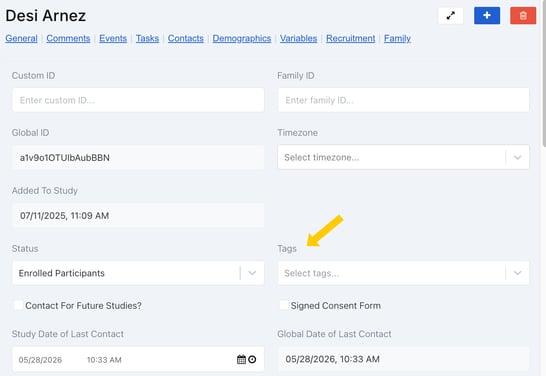
Multiple tags can be added in Tags box toward the top of the participant’s profile card.
How to Add a Tag to a Participant’s Profile
- Navigate to the participant’s profile.
- Locate the Tags box at the top of the participant profile card.
- Click inside the Select Tags box and begin typing the desired tag.
- Select an existing tag from the drop-down list, or select the option to create a new tag after you type in the name.
- Save to apply the tag to the participant’s profile.
Tip for Efficient Tagging!
- You can create new tags or select existing tags by typing the full tag and pressing Enter on your keyboard.
- To quickly add multiple tags, press Enter between each separate tag.
- This allows for a faster and more efficient tagging process when classifying participants.
Removing and Reporting on Tags
Removing a Tag from a Participant’s Profile
- When viewing a participant’s profile, each tag will have an "X" next to it.
- Click the "X" to remove the tag.
NOTE: Tags are not centrally managed in the system. A tag exists only when assigned to at least one participant. If a tag is removed from all participants, it no longer exists in the system.
Reporting on Tags
- Tags are included as data points on the Study Dashboard.
- To view tag counts, click "Show Table" at the bottom of the dashboard. Scroll to bottom of the CSV for data.
Filtering by Tags in a Study or Registry
To identify participants with the same tags in a study, you can filter using tags.
Steps to Filter by Tags at Study Level:
- Navigate to the Potential Participants or Enrolled Participants page.
- Select the "Filter" in the upper right.
- Choose Tags from the drop-down list.
- Type in the desired tag name to apply the filter.
- The page will display all participants in the study who have the selected tag on their profile.
Steps to Filter by Tags at Registry Level:
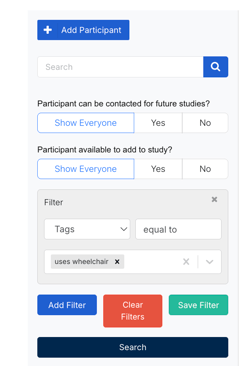
- Navigate to the Registry.
- Click "Add Filter."
- In the Filter box:
- Set the variable dropdown to "Tags."
- "Equal to" → Displays participants with the selected tag.
- Set the variable dropdown to "Tags."
-
-
- "Not equal to" → Displays participants without the selected tag.Choose a condition:
- Select the tags you want to include in the filter.
-
- Click Search to apply the filter to view the filtered list of participants.
Filtering by tags helps streamline participant management by allowing users to segment and analyze groups efficiently.