
EnrollNow offers seamless integration with Google Calendar or Outlook Calendar, allowing you to schedule and manage study events more efficiently. This article outlines the setup process and provides instructions for scheduling, rescheduling, and using placeholders to manage availability.
NOTE:
Before scheduling events through Google Calendar(Outlook Calendar), a Study Admin must first enable the Calendar integration in EnrollNow.
Once integration is complete, event scheduling can begin.
Scheduling a Participant for a Linked EnrollNow Event
After integration, scheduling should always begin in Google Calendar or Outlook Calendar. Each linked event in a participant’s EnrollNow profile card will display a Schedule icon.
Step-by-Step Instructions
1. Open your linked Google Calendar or Outlook Calendar
-
From within EnrollNow, click the Schedule icon in the Event details pane to open the corresponding calendar in a new browser tab.

-
-
Use Calendar’s drag-to-schedule or click the “Create” button to select your desired date and time.
-
NOTE: Google and Outlook may default to your personal calendar. Be sure to select the correct study calendar.
4. Enter event details
-
Set the title, date, time, and description as needed.
-
Include two required identifiers in the event’s title or description:
-
[event identifier](in square brackets) -
#CustomID(using a pound/hashtag and the participant’s Custom ID)
-

NOTE:
-
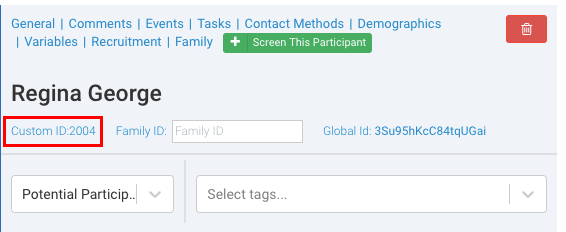
Participants must have a Custom ID in EnrollNow to be scheduled via Google Calendar or Outlook Calendar.
-
The event will not sync unless both
[event identifier]and#CustomIDare present and correctly formatted. -
No other characters, symbols, or spaces will be recognized by the integration.
✅ Example format:
[Consent] #2004
(where “Consent” is the event identifier and “2004” is the participant’s Custom ID)These formats are required for proper synchronization with EnrollNow.
 The scheduled
5. Save the event
- Once saved, the event will automatically appear in the participant’s EnrollNow profile and on the EnrollNow Calendar.

Rescheduling or Canceling a Linked Event
Once an event is created, the Schedule icon is replaced with the Reschedule icon. Rescheduling and canceling events can be done from either platform:
-
In EnrollNow: Use the Reschedule icon on the participant’s profile card.
-
In Google Calendar: Open and edit or delete the event directly.
- In Outlook Calendar: Open and edit or delete the event directly.
Changes that sync automatically to EnrollNow:
-
Event Date/Time changes within EnrollNow using Google's or Outlook's Date/Time picker or dragging the event to reschedule to another time slot
-
Updating the Custom ID in the event title/description (reassigns the event to a different participant)
-
Canceling or deleting the event from the calendar

TIP: Using Placeholder Events to Manage Availability
When organizing participant scheduling, using placeholder events in Google or Outlook Calendar can help your team manage availability and appointments more efficiently.
This method allows you to visualize open time slots and easily convert them into booked appointments—all while keeping EnrollNow in sync automatically.
Step-by-Step Workflow for Using Placeholders
1. Identify and Create Open Time Slots
Create recurring or manual placeholder events on your Google or Outlook Calendar to indicate when your team is available for participant appointments.
Example: For the Cornea Study, you might create placeholders for 1-hour slots at 11:00 AM and 2:00 PM, Monday through Friday.
These placeholder events act as visual indicators for available appointment times and help maintain an organized scheduling system.

2. Convert a Placeholder into a Booked Appointment
When you're ready to schedule a participant:
-
Open the placeholder event on your Google or Outlook Calendar.
-
Update the event title or description to include:
-
The relevant event identifier in square brackets (e.g.,
[Consent]) -
The participant’s EnrollNow Custom ID prefixed with a hashtag (e.g.,
#2004)
-
Example Event Title:[Consent] #2004

3. EnrollNow Automatically Syncs the Appointment
Once the event is saved in Google or Outlook Calendar with the correct format:
-
The event will automatically link to the participant's profile in EnrollNow
-
The scheduled time and date will be updated on the EnrollNow Calendar and the participant’s event details.

Benefits of This Approach
-
Provides a clear visual overview of both open and scheduled slots
-
Ensures faster scheduling workflows without duplicating work in both systems
-
Keeps EnrollNow automatically in sync with Google or Outlook Calendar
-
Scales easily across multiple linked study calendars
This placeholder workflow is recommended for teams managing high participant volume or coordinating across multiple team members.